How to create email distribution lists in Outlook and mail.com
Need to send an email to your book club or all the parents in your daughter’s class? If you email a group regularly, you can create an email distribution list, AKA a contact group, so you can send messages to them in a single click. Our blog shows you how to create email lists – in mail.com and using Outlook.
Keep reading for step-by step instructions on how to create and edit:

Create a contact group in mail.com
The mail.com address book lets you assign your contacts to one or more groups. In addition to the pre-defined groups in Contacts, like “Family”, you can create custom groups. Your groups not only help you keep your address book organized, but also can function as email distribution lists.To create a new group, log in to your mail.com account in the web browser and go to the Contacts tab. In the upper left corner, click New Group. In the window that opens, type in a name for your group and click Save. This new group will now appear on the list in your Groups tab.
Next, add contacts to your list. Click on the group name, then Add more Contacts. All you have to do is select the addresses by clicking the box to the left of the names. Now press Save, and voila! You have a distribution list
Send an email to a group
Now it’s time to send an email to your mailing list. You can click on the name of the group in your address book, then click on the envelope symbol. A window will open for you to compose and send your message. Alternatively, you can click on Compose E-mail and simply start typing in the name of the group. The name will pop up as a prompt, and you can click it to add it to your recipients.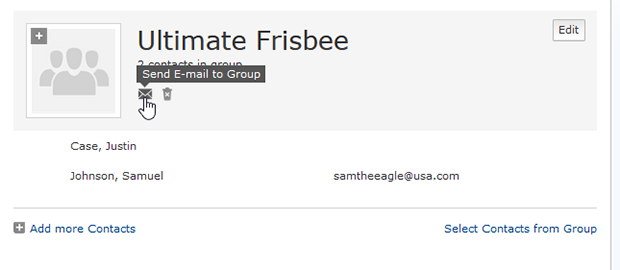
Adding or deleting contacts to your email group
Did someone join your club and you’d like to add a contact to you distribution list? No problem! Just click Contacts to see all the people in your address book. Click on the name of the person you wish to add to your group, and their contact information will open. Mouse over the Groups heading and an Edit button will appear. Click Edit, then check the names of the contact groups you’d like to add the person to. Finally, click Save.To remove someone from your distribution list, click on the name of the group and then click Edit in the upper right corner of the group information. Now mouse over the name you wish to delete and click the “-“ symbol that appears to the right of it. Finally, press Save.
Pro tip: Use the BCC field to keep your mailing list private
Once you have created a distribution list, consider which recipient field to use in your email. If you place recipient addresses in the To: or Cc: field, they will be visible to all other recipients of the message. Using the Bcc: field, on the other hand, will ensure that none of the recipients can see the addresses in your distribution list. This respects the data privacy of everyone who receives your email. It also protects them from having their inbox flooded it people start using “Reply all” to answer you.
To learn more about how to correctly use Cc and Bcc to address your email, see our deep dive: CC and BCC in email: Meanings and how to use them
Create an email distribution list in Outlook
If you use Microsoft Outlook, the process for creating an email group will be slightly different. Here, email distribution lists are called Contact Groups. To create a distribution list in Outlook:- In the lower left, select People – or if you are using compact navigation, click the people icon (see screenshot below).
- Select New Contact Group on your Home tab.
- Click Add Members to open an address book or list, then add addresses to your list by clicking them. When you are finished, click OK.
- Type in a name for your contact group.
- Once you have finished, click Save & Close.
Your new distribution list will now appear in your Outlook contacts. Whenever you want to send an email to this Outlook group, simply click on its name on that list – or open a new email and start typing the name of the group into the To field, then select it when it pops up.
How do I edit mailing lists in Outlook?
Once you have created a distribution list in Outlook, it is easy to go back and add or subtract members at any time.- Go to People or click the people icon
- Click Your contact lists
- Select a list and click Edit
- To add recipients, enter their names or email addresses and click Save
- To remove recipients, select the x for the name you wish to remove, then click Save
What is the difference between an Outlook group and distribution list?
When using Microsoft 365, there are different types of groups that can appear in Outlook. There is the distribution list/contact group described above, which is a collection of email addresses you can use to send an email to everyone in the recipient group you have defined. In addition, there are Microsoft 365 Groups (formerly known as Office 365 Groups) – when these are created, there is also an associated shared mailbox and calendar. In addition to serving as a distribution list for its members, a Microsoft 365 Group also integrates with other Microsoft collaboration tools such as OneNote, Teams, etc.
We hope you found this post helpful! Why not leave us some feedback before you start creating distribution lists! And if you still don’t have a secure email account with mail.com, sign up for free today!
This article first appeared on March 20, 2022, and was updated on April 25, 2024.
Images: 1&1/GettyImages
274 people found this article helpful.
Related articles