Protect your email app with fingerprint or facial recognition

What is biometric authentication?
Biometric authentication means using your unique biological features to make sure you are who you say you are. When you set up biometric authentication on your mobile device, for example, that usually means facial or fingerprint biometrics: a scan of your face or fingerprints is stored in a database and are compared with the facial features or fingerprints of the person who is trying to unlock your device. If the scan matches, access is granted.
Many apps that you install on your device let you enable biometric authentication for that specific app as well. So, you can add an extra layer of protection to applications where security is especially important – banking apps, payment platforms, and, of course, your email.
Adding an optional PIN or biometric login
The mail.com Mail app has always had the option of setting up a four-digit personal identification number (PIN) for extra security. But did you know that if your phone is set up to use fingerprint or facial identification, you can enable this biometric authentication for the app as well? This lets you skip the step of typing in the PIN each time, for even faster and more secure access.Keep reading to learn to set up a biometric email login on your phone:
- Setting up fingerprint or face ID in the mail.com app for iOS
- Setting up biometric authentication in the mail.com app for Android
Log in to the mail.com Mail app for iOS with Face ID or Touch ID
Depending what Apple iPad or iPhone you use, it probably features either Face ID (facial recognition) or Touch ID (fingerprint recognition). Once you have set up Face ID or Touch ID in your device settings, you can activate it to protect your mail.com Mail App as well.Turn on biometric protection in our iOS app
To enable biometric authentication:- Go to Settings, then tap Common Settings
- Tap PIN protected mode
- Tap Turn on PIN protection
- Enter a four-digit PIN of your choice
- Type your new PIN again to confirm and tap OK
- Depending on if your device uses fingerprint or face recognition, you will see an option to use Touch ID or use Face ID
- Toggle on Use Touch ID / Use Face ID (slider bar will now appear blue)
- Your iPhone may now prompt you to allow Touch ID/Face ID for the mail.com app. If you are not automatically taken to the settings, you can go to your iPhone Settings > Face ID & Passcode > Other Apps for this final step.
Customize biometric protection in our iOS app
You can also choose the interval before your app locks again and your PIN/fingerprint/face ID is required again:- Go back to the PIN protection mode setting in your app
- Enter your PIN
- Tap Require PIN, and select your preferred interval – from 10 seconds to 3 minutes
- To require authentication each time you open the app, select “On each App switch”
- A blue checkmark will appear to the right of your activated selection
Turn off biometric protection in our iOS app
If you would like to deactivate the PIN function:- Go to Settings, then tap Common Settings
- Tap PIN protected mode
- Enter your PIN
- Tap Turn off PIN protection
Activate biometric PIN in your mail.com Mail App for Android
If you have turned on fingerprint scan or facial recognition option on your Android smartphone, you can activate it in the mail.com Mail App as well. Then you can use it to open your email app as an alternative to a PIN.Enable biometric authentication in our Mail App for Android
Follow these steps to activate fingerprint or facial recognition:- Go to the menu bar and tap the menu symbol
- Tap the gearwheel symbol to open your settings
- Tap General settings
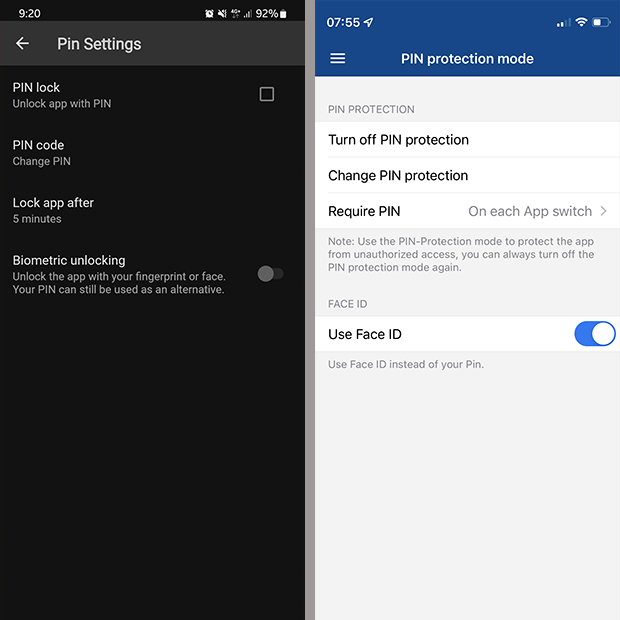
- Under Privacy, tap PIN lock
- In the PIN Settings, tap the checkbox next to PIN lock
- Enter a four-digit PIN of your choice
- Confirm your new PIN by typing it again
- Toggle on Biometric unlocking (slider will be blue)
Customize biometric protection in our Android app
Is your app locking too fast or too slow for your tastes? In the PIN settings, tap Lock app after and choose how long you’d like the app to remain open before authentication is required again – from one minute to 30 minutes. Alternatively, you can choose to require authentication only after the app has been manually closed.Turn off biometric protection in the mail.com Android app
If you would no longer like to use fingerprints or facial recognition, you can turn deactivate them at any time:- Go to the menu bar and tap the menu symbol
- Tap the gearwheel symbol to open your settings
- Tap General settings
- Under Privacy, tap PIN lock
- Toggle of Biometric unlocking (slider will be gray)
What are the advantages of biometric authentication for email?
You may be wondering why you should go through the trouble of setting up Face ID for your email app. Keep in mind that your email inbox may contain sensitive personal data, like financial statements. Plus, your email address can be used to log in to other important online accounts or to reset those passwords.
While we all enjoy the convenience of checking email on our phone, it’s a good idea to protect your email app by requiring additional authentication – this keeps your emails safe if your phone is ever lost or stolen. Fingerprint or facial recognition offers enhanced security without the hassle of remembering a complex password.
Congratulations! You can now take charge of your email security by setting up biometric authentication! Before you go to your settings, why not leave us some feedback below?
This article first appeared on October 13, 2022, and was updated on January 10, 2025.
Images: 1&1/GettyImages
1,690 people found this article helpful.
Related articles